Improve your Privacy with DNSCrypt
As of May 2023, roughly 94% of all traffic through Google’s servers is now encrypted. That’s a great win for internet privacy, unfortunately your browsing history can still be compromised via your DNS requests.
 ~94% of internet traffic is now encrypted!
What is DNS?
DNS is an acronym for Domain Name System. In the simplest terms, it is like a contact list for website domains.
- You type in an address (ie… blog.sweetpproductions.com).
- Your browser contacts your DNS name server to get the correct IP address.
- Your browser opens the website.
Most websites are https, isn’t that private?
Yes it is! but unfortunately DNS is not… Microsoft, Google, and Mozilla (Firefox) are creating encrypted versions of DNS, but it is not currently mainstream just yet. What does this mean for you? Well, every website you visit can potentially be logged by your ISP, or that free wifi network in your favorite cafe…
DNSCrypt
DNSCrypt solves this problem, by encrypting all your DNS requests, and optionally sending all requests through anonymous relays.
Setting up DNSCrypt on macOS
So, lets quickly get DNSCrypt up and running, you’ll need to dig into Terminal.app somewhat. But’s it’s not at all difficult, and will vastly improve your internet privacy
Install HomeBrew
Homebrew is a package manger for macOS, which simplifies the installation of DNSCrypt, as well as many other packages. First things first, open up Terminal.app, you can find it in your Applications\Utilities folder. Now copy and paste the following command to the Terminal window, and press enter:
/bin/bash -c "$(curl -fsSL https://raw.githubusercontent.com/Homebrew/install/HEAD/install.sh)"
Follow the prompts to finish installation, which will take some time depending on your internet connection speed. When complete, you will see an Installation successful! message.
Install dnscrypt-proxy
dnscrypt-proxy is the command line tool we are going to install to use DNSCrypt. With homebrew, its super easy to install. Copy the following command to your Terminal window, and press enter:
brew install dnscrypt-proxy
When installation has completed, we need to start the tool. You’ll need to enter your password after pressing enter.
sudo brew services start dnscrypt-proxy
Change macOS DNS settings
The final step is to change the DNS settings for your Mac, this is also super quick and easy:
- Open
System Preferences - Click on the
Networkicon - Select your Network Device, most likely Wi-Fi or Ethernet, the one on the top of the list, the one currently in use.
- Click the
Details...button - Open the
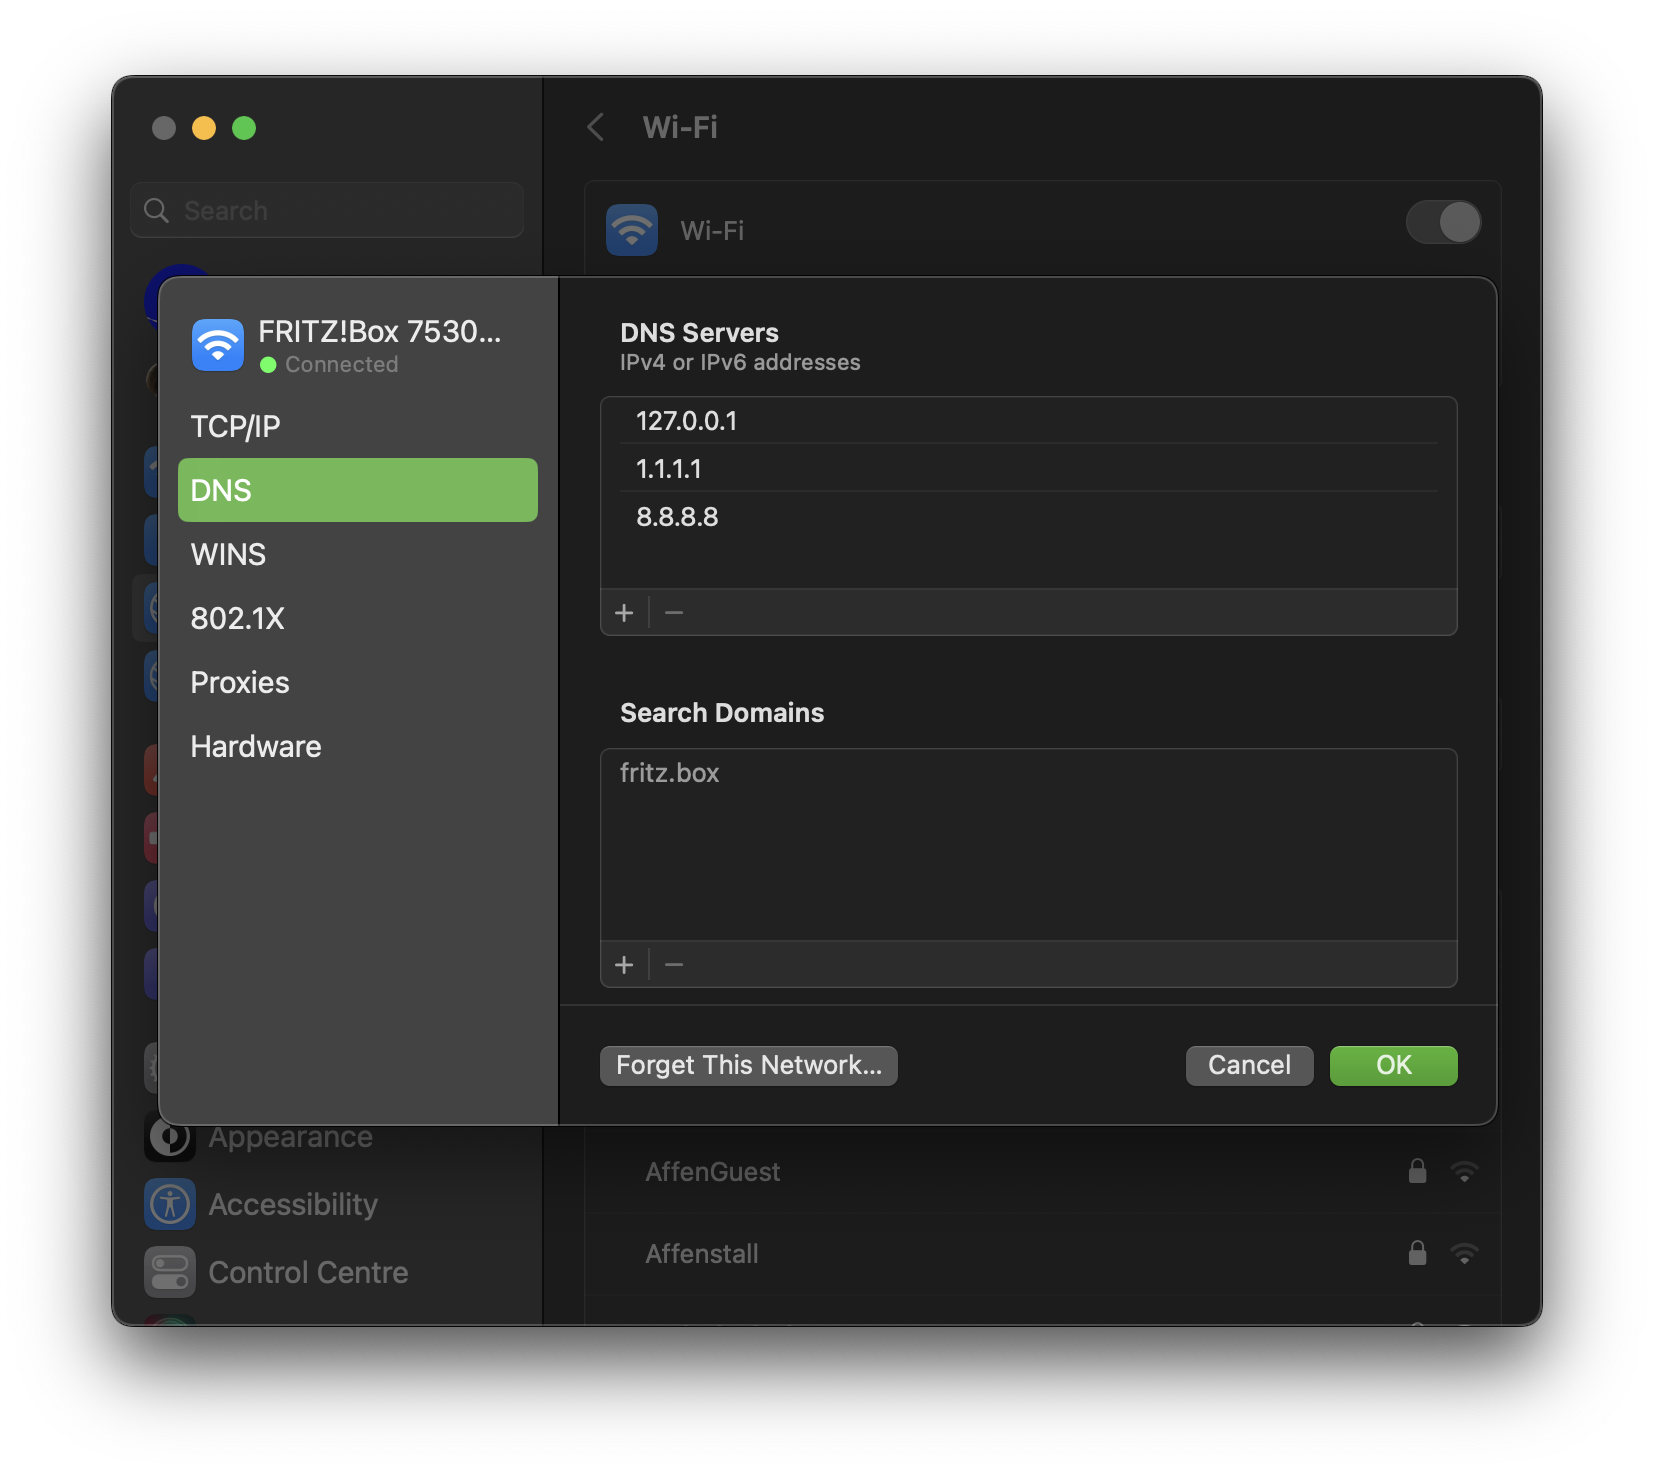
DNStab. - Add
127.0.0.1to the top of the list. *You can choose to also remove all other entries, to ensure that macOS doesn’t fallback to the other DNS servers in the case that DNSCrypt fails to resolve. - If you want to keep a fallback DNS server, you can add CloudFlares public DNS
1.1.1.1below127.0.0.1_this is totally optional _(I have 2 fallback servers in the screenshot below)* - Click on the
OKbutton
That’s it, your DNS requests are now all encrypted!
 Updated DNS settings
Anonymized DNS for enhanced privacy
Anonymized DNS is an optional new security feature of DNSCrypt which improves your privacy by anonymizing, and encrypting all your DNS queries. It’s also super easy to setup, we just need to edit the dnscrypt-proxy configuration file (located here: /opt/homebrew/etc/dnscrypt-proxy.toml) and restart dnscrypt-proxy. It’s not as difficult as it sounds!
- Paste the following command into your terminal window, and press enter:
open -a TextEdit /opt/homebrew/etc/dnscrypt-proxy.toml
- The configuration file will open in TextEdit.
- Open another blank Text Edit file, to create your
routes - Now, choose some relays from the following github page https://github.com/DNSCrypt/dnscrypt-resolvers/blob/master/v3/relays.md, one’s located closer to your actual location will give be slightly quicker. Heres a sample of what we need, change the values of the relays inside the [] square brackets. For example you could use the following 3:
'anon-cs-de2', 'anon-cs-nl', 'anon-ams-nl':
routes = [
    { server_name='*', via=['anon-cs-berlin', 'anon-cs-de', 'anon-cs-nl'] }
]
_You can keep the server name as _ so that the anonymized relays are used on all domains.*
- Now go back to the TextEdit file and search for
[anonymized_dns], directly below this line - copy and paste yourroutesyou justconfigured. Your configuration file will now look something like this:
...
[anonymized_dns]
routes = [
    { server_name='*', via=['anon-cs-berlin', 'anon-cs-de', 'anon-cs-nl'] }
]
...
- Save and close the configuration file.
- All thats left to do now, is restart dnscrypt-proxy:
sudo brew services restart dnscrypt-proxy
Success!
All your DNS requests should now be encrypted (and optionally, anonymized!) through DNSCrypt.
Some useful Terminal commands
dnscrypt-proxy
Stop
sudo brew services stop dnscrypt-proxy
Start
sudo brew services start dnscrypt-proxy
Restart
sudo brew services restart dnscrypt-proxy
Uninstall
sudo brew services stop dnscrypt-proxy
brew uninstall dnscrypt-proxy
Upgrade
brew upgrade dnscrypt-proxy
Homebrew
Uninstall
/bin/bash -c "$(curl -fsSL https://raw.githubusercontent.com/Homebrew/install/HEAD/uninstall.sh)"